No matter what type of product or piece of machinery you own, you’ll likely run into a problem at some point during its use.
Yes, this even includes such equipment as portable roof panel rollforming machines.
Luckily, most of the roof panel rollformer issues that you could run into have been experienced and successfully corrected in the past.
At New Tech Machinery (NTM), our Service Department experts work with rollforming machine owners daily to assist in fixing any machine problems and/or adjustments that a machine operator might experience. In other words, we’ve seen it all, which is why we know how critical it is to educate the industry about common roof panel machine problems and to remedy each one.
In this article, expect to learn more about the following rollformer problems:
- Oil canning
- Panel curvature
- Shear misalignment
- Markings/scratches transferring onto panels
Roof Panel Machine Problem #1: Oil Canning
What is Oil Canning?
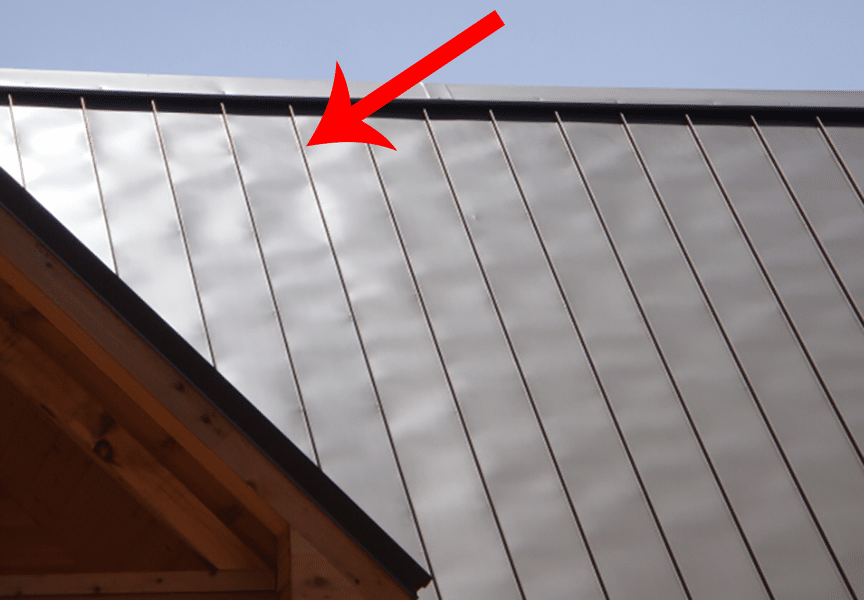
According to the Metal Construction Association,
“Oil canning can be defined as visible waviness in the flat areas of metal roofing and wall panels. In technical terms, oil canning is referred to as elastic buckling (more commonly known as “stress wrinkling”).”
Oil canning is a common occurrence in cold-rolled, light-gauge flat metal products, so if you see panels with noticeable waves between the seams, you’re most likely looking at oil canning. Luckily, in most cases, oil canning is simply a cosmetic issue that doesn’t diminish the integrity of a roof or wall system. However, most people consider it unsightly and try to avoid it if possible.
Why Does Oil Canning Happen?
Oil canning is a complex phenomenon to measure and determine the source of, mainly because it has numerous causes that could come into play. One of the most prominent reasons metal warps to form oil canning is because metal inherently wants to return to its original shape. So when it’s getting processed and rollformed, the metal takes on a new form but may attempt to revert back to how it was before. Such movement can form the wavy bumpiness characteristics of oil canning.
The majority of oil canning instances are caused by:
- Manufacturing stress on the metal
- Rollforming and slitting pressure inflicted on the metal
- Unaligned panel installation
- Inaccurate or irregular movement of panels
- Lack of thermal movement space
- Incorrect installation of accessories (clips and fasteners)
- Installing on an uneven substrate
How to Fix Oil Canning
Once oil canning works its way into a panel, there isn’t a way to fix or get rid of the waviness. But there are some preventative measures that you can take to avoid the possibility, including:
- Choosing a lower gloss finish
- Ensuring the roof deck is even
- Use tension-leveled metal
- Put backer rods underneath the panels
As it applies to a portable roof panel rollforming machine, there are a couple of different ways to correct some of the oil canning; most of which involve putting some type structure into the flat area of the panel.

Typical structure ribs include:
- Clip relief (a standard in all NTM roof panel profiles)
- Bead ribs
- Pencil ribs
- V-ribs
- Striations
- Corrugations
Roof Panel Machine Problem #2: Panel Curvature
What is Panel Curvature?
Another common issue that can occur with a roof panel machine is the panels are not coming out of the machine in a straight line, which is called panel curvature. There are two main types of panel curvature that you could experience:
- Uphill – If a panel is running uphill, the ends of the panel are coming up off the deck while the middle of the panel is touching the deck.
- Downhill – If a panel is running downhill, the center of the panel is coming up off of the deck while the ends touch the deck.
Why Does Panel Curvature Happen?
The most common reasons that panel curvature occur are:
- Different materials respond in different ways, which may mean an adjustment to the Camber Station is required before panels will run completely straight.
- The run-out stands, if applicable, are not adjusted to the correct height that the panels are exiting the machine from.
How to Fix Panel Curvature

Every roller set is equipped with one or more camber stations toward the exit end of the machine. The Camber Station adjustment can be used to make the panel run straight if it is going uphill or downhill. Before you make any adjustments, make sure the run-out stands are properly adjusted for height and that the panel can run straight out of the machine.
If the run-out stands are in alignment, adjust the Camber Station as necessary using the following procedure:
- Create a base point to start from by marking the top camber bolt as well as scribing a line across the center block and the two uprights (see photo on the right).
- If the panel is running downhill: Adjust the second to last station down by turning the top bolt counter-clockwise.
If the panel is running uphill: Adjust the second to last station up by turning the top bolt clockwise.
(Note: The above instructions apply to a New Tech Machinery SSQ II™ MultiPro Roof Panel Machine. Additionally, it is recommended to make one small adjustment at a time, such as a 1/8 turn, and then run a panel to see the results after each change. Over adjusting the stations can create unpredictable and drastic results.)
Download or print this reference guide on making the appropriate camber station tooling adjustments in your roof panel machine.
Roof Panel Machine Problem #3: Shear Misalignment
What is Shear Misalignment?
At NTM, our roof panel rollformers are post-cut machines, which means a shear is used to cut the panels after it’s rollformed and before it exits the machine. When there is a shear alignment issue, the shear is not accurately cutting panels, which may mean that the Entry/Exit Shear Dies are misaligned or the shear blades are not appropriately positioned according to the profile type.
To spot shear alignment issues, you may see:
- The shear is cutting the metal in a jagged or uneven manner.
- A sheared panel is hitting or getting snagged on the exit die.
- A worn out center mandrel.
- A broke shear die.
Why Does Shear Misalignment Occur?
The shear, which is electrically activated and hydraulically driven in NTM’s SSQ II Machine, is not “one size fits all” for every metal roof panel profile. For example, the Entry and Exit Shear Dies might be in alignment for rollforming the SS450 profile but are completely out of alignment for the SSQ275 profile. In other words, it’s not always at the shear is broken or something happened to the part, but rather that it just needs to be adjusted to fit the current profile.
Additionally, improper cutting might be due to inadequate maintenance performed on the shear.
How to Fix Shear Alignment
There is more than one way to fix the problems you might be experiencing with the shear. We’re going to outline a few of the most common fixes. If you are making the following adjustments and the issue is not resolved, please contact NTM’s Service Department so they can walk you through further steps to remedy the problem.
Adjusting the Entry and Exit Shear Dies
The Entry and Exit Shear Dies are specific to each roller set and may need to be changed when changing profiles. The Dies must be adjusted to the proper distance from the vertical legs of the panel. The outside vertical leg of the male and female Entry Dies should be approximately 1/32” away from the outside of the vertical legs of the panel. The Exit Dies should be positioned slightly to the outside of the male and female Entry Dies so that after a cut is made, the panel does not get hung up on the Exit Dies.
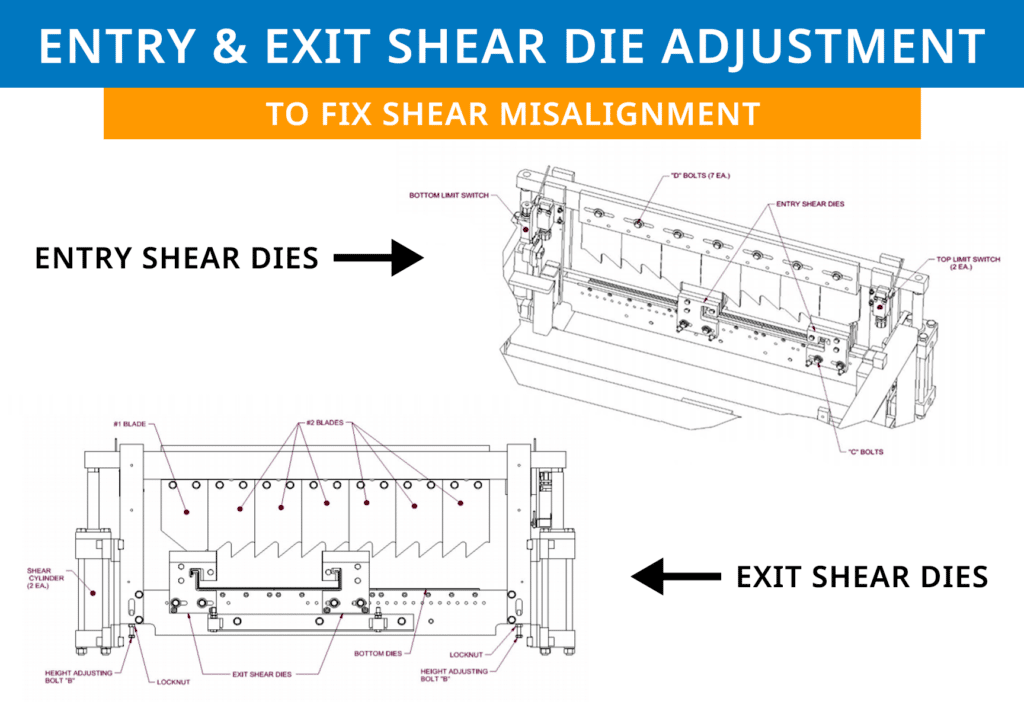
Follow this procedure to make the adjustments (see right drawing to follow along):
Entry & Exit Shear Die Adjustments
- Run material through the machine until it is about six (6) inches away from the shear, then shut off the machine and disconnect the power.
- Sight down the legs of the panel to find the approximate location to install the Entry Shear Dies. Hold them in place with the “C” bolts but do not tighten them yet.
- Start up the machine and carefully jog the material forward while looking through the dies. If it seems like the panel will hit the dies, shut off the machine and disconnect the power. Then, further adjust the dies as necessary until the panel goes through cleanly.
- Continue jogging the panel forward until it is about an inch or two past the shear dies, then shut off the machine and disconnect power.
- Adjust the Entry Shear Dies until they are about 1/32” away from the outside of the vertical leg of the panel. Each profile will look different, so make sure to reference your manual to see how it is shown. Tighten the “C” bolts.
- If the Entry Shear Die has a Mandrel, it should be positioned as shown in the figure for your panel. If necessary, loosen the “E” bolts and adjust the Mandrels. Retighten the “E” bolts.
- Install the Exit Shear Dies and adjust them so they are about 1/32” to the outboard of the Entry Shear Dies, as shown in the figure for your panel. Tighten the “C” bolts.
- Adjust the Mandrel on the Exit Shear Die as needed, if it has one.
Blade Adjustments
- To cut properly, the Top Blades need to be positioned so that one of the #2 Blade tips is just to the inside of the male leg, as shown in the photo. Also, the tip of the #1 Blade is positioned to the inside of the female leg. The rake or angle of the blades should cut in a scissor action outward against the legs. If necessary, loosen the seven “D” bolts and move the Top Blades left or right to get them in the correct position. Retighten the bolts.
- Start the machine and shear off a panel about 12 inches long, then jog the material forward a few inches. Make sure the panel is not scraping on the shear dies and inspect the quality of the cut on both sides. If any corrections need to be made, shut off the machine and disconnect the power, then adjust the shear dies.
Maintaining the Shear
Clean and lubricate the Top Blades, Bottom Dies, and Male/Female Dies at least once a day (or approximately every 30 cuts) during regular use, or whenever cutting surfaces look dry. Proper lubrication is essential to clean cuts, rust prevention, and longevity of the shear.
We recommend Super Lube Multi-Purpose Synthetic Dri Film Aerosol Lubricant with Syncolon as a shear lubricant (it’s also available to purchase through New Tech Machinery).
(Note: The shear is extremely dangerous and can cause serious bodily injury or death. For this reason, the machine is provided with a guard to prevent the operator from reaching into the shear. It is crucial that the guard remains in place at all times when the machine is in operation. The guard should only be removed for maintenance and adjustment of the shear when the machine is unplugged/unpowered.)
Roof Panel Machine Problem #4: Panel Markings
What are Panel Markings?
Panel markings are pretty self-explanatory, meaning they are marks on the panel that occur during the rollforming process. These might take the form of long streaks or imperfect spots on top or bottom of the panels. Additionally, what appears just to be panel markings might also be scratches that are stripping the paint off of the metal substrate.
Why Do Panel Markings Happen?
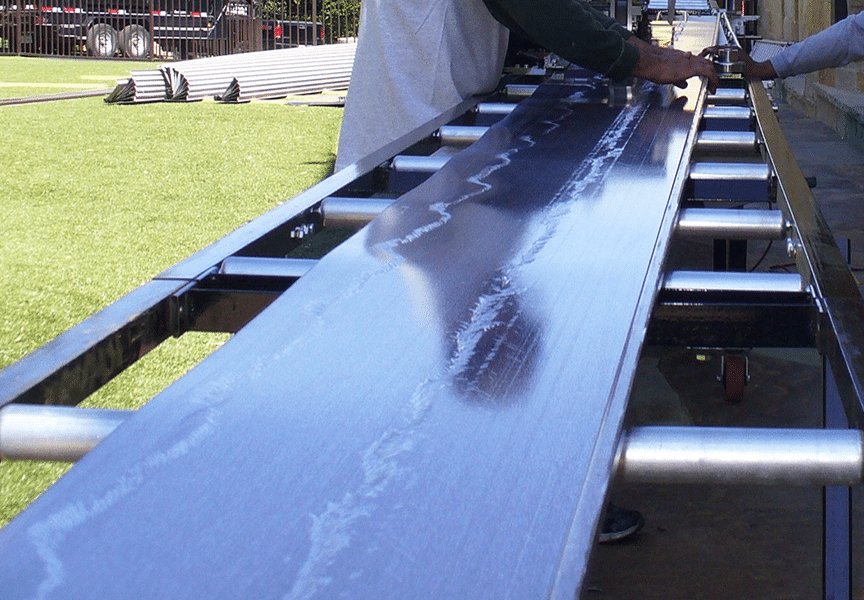
For the most part, panel markings are due to dirt and debris stuck in or on one of the components inside of the rollformer. Some common causes of markings include:
- Dirt and debris trapped in the forming or drive rollers
- Film on the metal sheet/coil catch a roller or get stuck in the machine
- Pieces of plastic getting caught up in the machine
- The metal is scraping up against the Exit or Entry Shear Dies
How to Prevent or Fix Panel Markings
Since panel markings have so many different underlying causes and origins, there are a variety of fixes and recommendations for remedying the problem.
If a part of the machine is out of alignment and scratching the paint off of the metal, it’s imperative to try to pinpoint the issue so you can reference the manual for how to fix it.
For other issues where there is something stuck in the machine, we recommend the following to prevent or fix the problem:
- Before operating the machine, always visually inspect for foreign objects, debris, film, or anything unusual present within the machine. If something doesn’t seem right, check and remedy the problem before running any roof panels.
- Keep the machine empty during transportation and when in storage.
- Avoid storage of the machine outdoors for long periods. If possible, cover the machine with a tarp to protect it, but still provide proper ventilation to prevent condensation and rust from forming.
- Always keep the machine covers on during operation and storage. The covers are for operator safety, but also protects the internal components of the machine from the environment.
- Regularly clean Drive Rollers with soap and water and a Scotch Brite Pad. (CAUTION: Do not use harsh chemicals or solvents or damage will occur.)
Final Thoughts
One of the easiest ways to prevent an issue before it happens is staying educated on potential problems and knowing what to look for before it turns into a significant issue.
To recap:
- Oil canning is an inherent characteristic of flat cold-rolled metal. One of the best ways to prevent it from occurring is to put rigidity, such as a rib roller or striations, into the flat section of the panel.
- Uphill or downhill panel curvature can be fixed with adjustments in the Camber Station.
- Shear misalignments are frequently due to profile changes and can be remedied by adjusting the Entry and Exit Shear Dies or the Blades.
- Proper maintenance and care when the portable roof panel machine is in and out of use will help ensure the panels are not marked up during rollforming.
For over 28 years, New Tech Machinery has been manufacturing portable rollforming equipment and helping its customers with their machine issues if/when they come up. Most of the time, rollformer problems are common and can be fixed using one of our tips and tricks, which are often just slight adjustments or proper maintenance.
If you’re experiencing a rollformer problem or need troubleshooting assistance, please contact our Service Department today.
